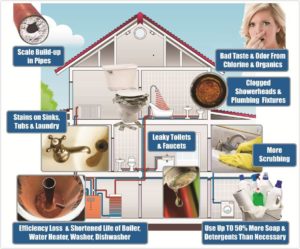
problems caused by hard water
Time to install a water softener?
Scale build-up?
Bad taste & odor in water?
Stains on sinks, tubs, & laundry?
More scrubbing to get mineral deposits off faucets & shower heads?
If you’re experiencing any of these problems it’s time to get your water tested. A water softener system is the most cost-effective way to correct hard water hassles.
Once you’ve made the decision to install a water softener, you have some other choices to make.
DECISIONS, DECISIONS….
One choice will be the type of water softener you buy. Another will be how you will install the system. Many homeowners are comfortable with plumbing tasks and can do a DIY install. Others will want to enlist the services of a professional.

If you’re thinking about a DIY install, here are some pointers to get you started:

1. PERMITS
Be sure to check with your local building codes. Some locations require permits for installation of water softener units. They may also require emergency by-pass or shut-off valves. Local code requirements may affect your choice of system.
2. CHOOSE YOUR SYSTEM
Once you have the permit issue clear, your next step is to choose which water softener system you want to install. A multitude of online water softener sites provide an overload of information. You can get better information and more personal answers from your local water treatment service. We’ll help you evaluate your needs and get the best system for you.
 3. TOOLS
 3. TOOLS
OK. You’ve gotten your permit and selected your system. Before you go to pick it up, or have it delivered, make sure you have the basic tools need to get the job done properly. Basic plumbing tools should be enough to get you started.
|
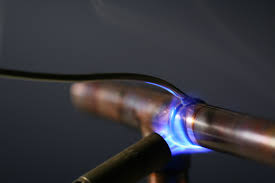
Pipe cutter Pipe wrench Torch & solder Pipe fittings Flex pipe tubing Copper pipe PVC solvent Teflon tape Elbow unit Gloves and safety goggles Pipe wrenches |
4. CHOOSE YOUR LOCATION
Permit? Check. System? Check. Tools? Check. Excellent! 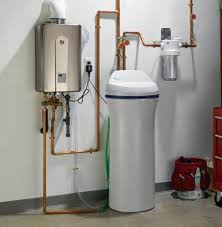 Now you need to find a place in your house where you will install the system you’ve chosen. Things to remember when selecting the location for your water softener include:
- Easy for you to access to install & maintain
- Access to electrical outlet
- Close to drainage (floor drain, standpipe, sump pump, or utility sink)
- Connection must be before water heater split
- Connection must allow softened water to water heater and inside faucets, but not to outside hose faucets
5. INSTALLATION PROPER
 (Note: These are general installation steps. We like these DIY instructions for salt-based, reverse osmosis, and magnetic systems.)
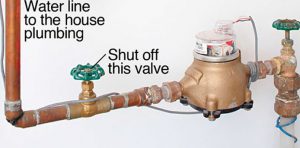
Step 1: Shut off water to house.
Find the shut-off valve (usually in your basement) and close it. Now, open the lowest valve in your house water line to drain all water from the inside pipes. Once pipes are drained, proceed to the next step.
Step 2: Cut the main line.
Use your pipe cutter to cut open the main water line where you’ve chosen to install your water softener.
Step 3: Connect by-pass or shut-off valve.
Follow manufacturer instructions to install the by-pass or shut-off valve. You should install this as a safety feature whether your local building codes require it or not.
 Step 4: Tie in to water supply.
 Step 4: Tie in to water supply.
Use copper or flexible tubing and pipe fittings to connect water softener to main water supply.
Step 5: Set up drainage
Connect drain hosing to unit and clamp it in place. Feed the end of hose near where it will drain. Be sure to leave about a two-inch gap to prevent any backwash from contaminating the system.
Step 6: Connect brine tank (salt-based systems)
Connect the large backflow hose to the brine tank. Refer to your manufacturer’s instructions for details.
Step 7: Flush tank
Turn the valve into the bypass position and flush water through to clear any debris or sediment in the tanks.
Step 8: Add salt (salt-based system)
 Step 8: Add salt (salt-based system)
If you own a salt-based system, add salt to the brine tank following your manufacturer’s instructions.
Step 9: Turn on the water
Start by turning on a cold water tap somewhere in the house. Next, turn on the main line valve slowly until it is fully open.
Step 10. Plug unit in and set up timer
Plug your unit securely into the outlet. Follow manufacturer instructions to set timer on your system. Timer settings include time of day, hardness level of your water, and details related to the rinse and regeneration cycles of your individual model.
THAT’S IT! Enjoy your new soft water!!!
Knoxville Water Treatment knows that installing a water softener system requires a lot of work. If you have questions during your DIY installation, or if you decide you’d like a professional to do the job, give us a call today. We’re stocked with top-of-the-line water softener systems and offer free water testing. Get in touch today!
![]()


