Posts

Water softeners.

Salt-based. AMT. Ion-exchange. RO.

Choosing a new water softener can be confusing. Don’t let the process tie you in knots!

The bottom line:  consider what would benefit your household the most. To help you get a handle on finding your new water softener system, we’ve put together a list of the most common water softeners and a brief explanation of their pros and cons. Happy reading!

Salt-Free Water Softenerssalt free water softeners

While it is commonly thought that salt-free water softeners remove hard water chemicals, that is not the case. This type of water softener changes the chemical composition of the magnesium and calcium in the water so that they won’t stick to surfaces. All that means is that you won’t have a residue buildup in pipes and lines, the walls of your hot water heater, and no “scales” on your dishes. The “salt-free” water softener doesn’t “soften” one’s water, but rather “conditions” it. This option is more of a filtration system than a water-softening system.

Magnetic/Anti-Scale Magnetic Treatment (AMT)

The AMT is less expensive than some other water softener options, including salt-based. It has an incredibly long-life expectancy of up to forty years. This would also be a great option for the household that needs to limit their daily sodium intake. While this option is considerably cheaper than its counterparts, unfortunately, hard water scalingit comes with a catch. An AMT doesn’t remove hard water chemicals, it just alters their composition, so they won’t leave as much “scale” effects on dishes. This option does not prevent buildup in water-using appliances where water stays for up to forty-eight hours, such as a hot water heater. There is also less scientific evidence that this method works efficiently and effectively.

Salt-Based/ Ion Exchangesalt based water softener ion exchange

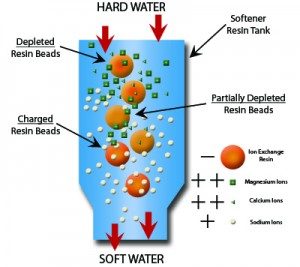
This water softener option uses the process of Ion Exchange, which removes the hard water chemicals magnesium and calcium from the water. During this process, the hard water chemicals are attracted to a negatively charged polymer resin bed, which is what removes them from the water supply. Those chemicals are replaced by positively charged sodium ions when salt is used to clean the water softener and regenerate the resin bed so that it can continue to do its job effectively. This option is the exact definition of what a water softener is.

Reverse Osmosis

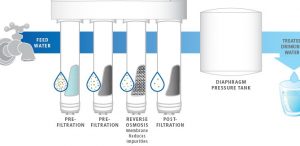
As with the salt-free water softener system, Reverse Osmosis (RO) is more of a filtration system than a water softening system. This option uses hydrostatic pressure across the membrane, which acts as a type of water filter. This process physically removes contaminates and hard water chemicals from the water supply itself. Below is a list of benefits for installing a reverse osmosis system:

reverse osmosis system

Tasteless water– some water supplies have a foul taste to them and adding a RO system might help to alleviate this problem.

Tinted and/or Stinky Water– hard water minerals and even some impurities can cause a water supply to look murky and have an unpleasant smell. RO might help to fix this.

This option is also considered more environmentally friendly than others since it doesn’t use chemicals in its process. Some reports say that this process can remove up to ninety-eight percent of water imperfections. RO can be a tricky system to use. For example, some reports find that consumers only had five to fifteen percent of usable water returned. The rest just washed down the drain. You can read more about reverse osmosis water softeners here.

So, how do you decide?

Ultimately, it is up to you, but Knoxville Water Treatment is here to help. Our experts in water softening systems can meet with you and help you determine what is best for your household. We’ll help you assess past concerns and issues, identify your specific household needs and get the water softener system that’s just right for you and your family. Give us a call today!

water softener

                        problems caused by hard water

Time to install a water softener?

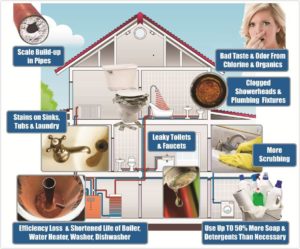
Scale build-up?

Bad taste & odor in water?

Stains on sinks, tubs, & laundry?

More scrubbing to get mineral deposits off faucets & shower heads?

If you’re experiencing any of these problems it’s time to get  your water tested.  A water softener system is the most cost-effective way to correct hard water hassles.

Once you’ve made the decision to install a water softener, you have some other choices to make.

DECISIONS, DECISIONS….

One choice will be the type of water softener you buy. Another will be how you will install the system. Many homeowners are comfortable with plumbing tasks and can do a DIY install. Others will want to enlist the services of a professional.


If you’re thinking about a DIY install, here are some pointers to get you started:


1. PERMITS

Be sure to check with your local building codes. Some locations require permits for installation of water softener units. They may also require emergency by-pass or shut-off valves. Local code requirements may affect your choice of system.

2. CHOOSE YOUR SYSTEM

Once you have the permit issue clear, your next step is to choose which water softener system you want to install. A multitude of online water softener sites provide an overload of information. You can get better information and more personal answers from your local water treatment service. We’ll help you evaluate your needs and get the best system for you.

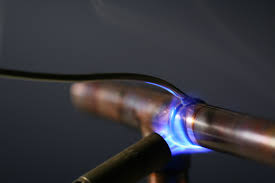
soldering a copper pipe3. TOOLS

OK. You’ve gotten your permit and selected your system. Before you go to pick it up, or have it delivered, make sure you have the basic tools need to get the job done properly. Basic plumbing tools should be enough to get you started.

Pipe cutter      Pipe wrench      Torch & solder      Pipe fittings      Flex pipe tubing      Copper pipe           PVC solvent      Teflon tape      Elbow unit      Gloves and safety goggles     Pipe wrenches

4. CHOOSE YOUR LOCATION

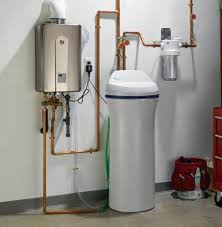
Permit? Check. System? Check. Tools? Check. Excellent! water softenerNow you need to find a place in your house where you will install the system you’ve chosen. Things to remember when selecting the location for your water softener include:
  • Easy for you to access to install & maintain
  • Access to electrical outlet
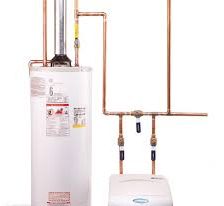
  • Close to drainage (floor drain, standpipe, sump pump, or utility sink)
  • Connection must be before water heater split
  • Connection must allow softened water to water heater and inside faucets, but not to outside hose faucets

5. INSTALLATION PROPER

water shut off(Note: These are general installation steps. We like these DIY instructions for salt-based, reverse osmosis, and magnetic systems.)
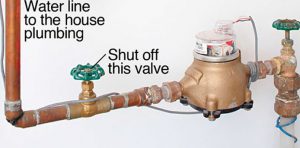
Step 1: Shut off water to house.

Find the shut-off valve (usually in your basement) and close it. Now, open the lowest valve in your house water line to drain all water from the inside pipes. Once pipes are drained, proceed to the next step.

Step 2: Cut the main line.

Use your pipe cutter to cut open the main water line where you’ve chosen to install your water softener.

Step 3: Connect by-pass or shut-off valve.

Follow manufacturer instructions to install the by-pass or shut-off valve. You should install this as a safety feature whether your local building codes require it or not.

water softenerStep 4: Tie in to water supply.

Use copper or flexible tubing and pipe fittings to connect water softener to main water supply.

Step 5: Set up drainage

Connect drain hosing to unit and clamp it in place. Feed the end of hose near where it will drain. Be sure to leave about a two-inch gap to prevent any backwash from contaminating the system.

Step 6: Connect brine tank (salt-based systems)

Connect the large backflow hose to the brine tank. Refer to your manufacturer’s instructions for details.

Step 7: Flush tank

Turn the valve into the bypass position and flush water through to clear any debris or sediment in the tanks.

Step 8: Add salt (salt-based system)

If you own a salt-based system, add salt to the brine tank following your manufacturer’s instructions.

Step 9: Turn on the water

Start by turning on a cold water tap somewhere in the house. Next, turn on the main line valve slowly until it is fully open.

Step 10. Plug unit in and set up timer

Plug your unit securely into the outlet. Follow manufacturer instructions to set timer on your system. Timer settings include time of day, hardness level of your water, and details related to the rinse and regeneration cycles of your individual model.

THAT’S IT! Enjoy your new soft water!!!

Knoxville Water Treatment knows that installing a water softener system requires a lot of work. If you have questions during your DIY installation, or if you decide you’d like a professional to do the job, give us a call today. We’re stocked with top-of-the-line water softener systems and offer free water testing. Get in touch today!


Loading

            Water, anyone?

Who doesn’t love a glass of cool, clear water on a hot day? Unfortunately, many people who go to their sink for a glass of refreshing, clean, clear water find themselves disappointed — or even kind of grossed out. Water taps across the country spurt odd-smelling water. The water often has unidentifiable particles of … well, something… floating in it and even sticking to the sides and bottoms of the glasses. No thanks! If this describes the water from your tap, it’s time to invest in a water filtration system. One of the most popular types of drinking water filtration systems is the reverse osmosis water filter system, or RO, for short.

What is Reverse Osmosis?

You usually hear about  reverse osmosis as a way to make ocean water drinkable by removing the salt.  Dictionary.com  says reverse osmosis is the process of producing pure water by forcing water with salt or other solid particles in it through a semi-permeable membrane. In order to really understand reverse osmosis, we need to talk first about regular osmosis.

Osmosis

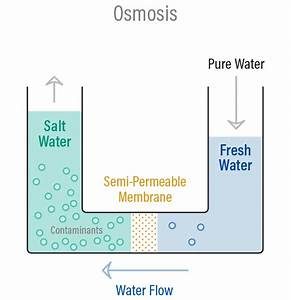
Osmosis occurs when water moves through a semi-permeable membrane from an area of higher concentration of water particles to an area of lower concentration of water particles.

   Think of it this way:

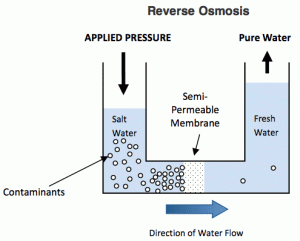
You have one cup of fresh water and one cup of water with salt mixed into it. You pour the salt water into the left side of this U-shaped glass beaker. Then you pour the fresh water into the right side. A very thin plastic membrane filled with thousands of very tiny holes sits in the center of the bottom tube of the beaker. When you pour the cups of water into each side of the beaker, the fresh water flows to the side of the salt water.  The water level in that side of the beaker rises. This happens because there are more water molecules in the fresh water compared with the water molecules in the salt water. The fresh water moves toward the salt water to even up the number of water molecules.
Reverse Osmosis

Reverse osmosis occurs when you apply  pressure to salt water. The pressure forces the salt water up against the membrane. The salt particles are too large to fit through the membrane openings and only the small water particles are pushed through. The membrane effectively filters out the salt and contaminants, allowing the now-clean water to pass through and mix with the fresh water on the right-hand side.
So how does all this work in a home drinking water system?

How reverse osmosis water filters work in your home

If you want to install a reverse osmosis system for your whole house, we can help with that. Most families, however, choose to start with a much smaller reverse osmosis water filter system that fits underneath the counter.

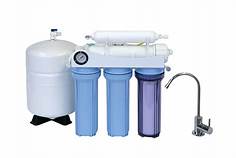
The reverse osmosis water filter system is connected to your water supply and the system processes the water  through a series of 3 to 6 tube filters before it passes into the storage container.  A separate faucet, installed on your sink, draws clean, filtered water from the storage tank. Some folks don’t want to install a complete reverse osmosis water filter system under their sinks. Most stores also carry a counter-top model of the reverse osmosis water filter system. This unit sits on the counter and connects directly to the faucet.

Now what?

Not sure if you want to try a DIY install for your reverse osmosis water filter system? Or maybe you need help figuring out what type of water filter system is best for you. Whatever your water purification needs, Knoxville Water Treatment can help. Give us a call today and start treating yourself to the best water you can get!


Loading

Okay, you’ve tested your water or know it can be better and you’re considering purchasing a water filter. You’ve seen water filters attached to faucets in other’s homes, but did not realize how many different kinds of filters there are and how differently they can be installed! This quick read article can hopefully assist you in sorting your thoughts and narrow your choices. They are listed from simplest technology to most complicated and basically in order of value as well. If any hesitation regarding the right choice for your home and family, consider calling your local water treatment professionals.

What If I Just Purchase Bottled Water?

What if you’d rather not deal with the fuss getting a water filter that does or doesn’t do the job and just purchase bottled water? After some research you’ll find that bottled water is one of the least cost effective, environmental and healthy options available for clean water. The cheap plastic, often containing BPA and other unhealthy elements, can easily leach into the water itself and the water is not much cleaner than tap water when you consider all its pitfalls.

Pitcher Filters

Water pitchers that contain a water filtration system within the lid can be easy traveling or quick options, but over time the charcoal filters can get very expensive quickly. It does not remove all toxins or the worst kinds from the water and requires constant filling to keep up with your family. Faucet attachments that contain the same filtration (charcoal) are just as ineffective and costly. There are better options on the market.

Reverse Osmosis Filtration

This technology is also a charcoal filter that needs replacement parts over time, but runs the water through more than the previous options. It removes major contaminants, including arsenic, chlorine, heavy metals, and other bacteria. It usually attaches below the sink and has a holding tank. It can be more time efficient than the previous options, but still takes an hour to make one gallon of drinking water. It’s got the same cost con associated with the replacement filters and is worst socially because it wastes a ton of water that it rejects during its process.

Water Distilling At Home

Water distillers are very effective at removing chlorine, heavy metals, bacteria and other toxins from your drinking water. Unfortunately they are large and expensive. They use a lot of electricity which only adds to its cost. Due to a loss of mineral deficiency from using certain filters, you can experience negative side effects. This is something to consider when going with this or any of the previous filtration options.

Solid Block Carbon Filters

This technology is the answer to previous issues with other filters. The pitcher filters and faucet filters use the same kind of technology except the charcoal in theirs is not solid and that’s where they remove less toxins. Solid block carbon filtration systems are units that take up some counter space, but remove the most toxins with the least amount of replacement. The unit itself can be costly, but the filters cost less than previous options do over time. The best thing about this option is that it does not require electricity or running water and will make any water safe, including rain water, pond water, and even salt water. It even removes food coloring from water and comes out clear!