Salt Bridge. Sounds like a magical structure in a fairy tale land, doesn’t it? But here in the REAL world it is a big problem for homeowners if left untreated.

What is a salt bridge?

A salt bridge is what happens when a crust-like structure forms in the brine tank of an ion exchange-based water softener system.

First of all, let’s review. 
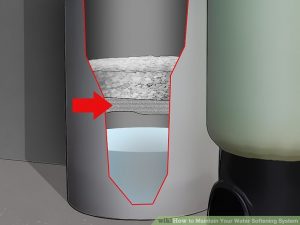
This crust creates an empty space between the water and the salt in the brine tank. When this happens, salt cannot dissolve into the water in the brine tank. This means the water softener won’t make the brine needed to rinse out the resin in the water softener. Without brine, the resin beads can’t do what they are meant to do, which is soften water.

How do I know I have a salt bridge?

If the water softener is malfunctioning, there will be signs indicating this. Some thing to look out for would be how quickly the soap and/or detergent runs out. If the water softener has a salt bridge in the brine tank, its basically like the house is running on hard water again. The excess minerals in hard water drastically counter-act the way the household soaps and detergent perform. Another way to tell is by the appearance of clothes and dishes. If the dishes have a foggy or musty look to them, or the clothes are dingy and stiff, that means that the water softener is not working. Salt bridges prevent the water softener from regularly regenerating, which in turn halts all of the other functions.

What are some things that can cause salt bridges?

Thankfully, there are only a few reasons why there would be a salt bridge in the brine tank. The first reason might be because of the type of salt that was used. Make sure to purchase the right type of salt for the home’s water softener. Another reason might be because of high humidity levels. When the humidity level rises, the condensation in the brine tank affects the way the salt interacts with itself. Condensation causes the salt crystals to clump together, thus creating a salt bridge. The simplest reason though would be that too much salt was put into the tank and it can’t dissolve it all in a timely manner.

How to fix a salt bridge problem

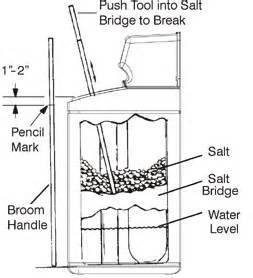
Fortunately, this is an easy fix that shouldn’t require the help of professionals. First, make sure that the water is shut off to the water softener. The next thing to do would be to find either a broom or a mop with a sturdy handle. Gently use that handle to break the top of the crust of the salt bridge. After that, use some a plastic container like a bowl or Tupperware, to remove the salt pellets from the brine tank. Continue to break apart the salt bridge, careful to avoid scoring the walls of the tank, as this can cause more problems. Gently hammer away at Salt Bridge, staying away from the sides of the tank. Use the plastic object to remove the excess chunks of Salt Bridge from the tank. Then take a wet/dry vacuum and suck out all the remaining pieces of salt. Turn on the water supply to the water softener. Add new salt, being sure ft follow the instructions on how to refill the salt. It should be no more than 2/3 filled in the brine tank.

What comes next?

Salt bridge repair is a pretty easy DIY fix. We know DIY is not for everyone, though. Give us a call and we will get someone out right away to take care of the problem. Once you have your water softener up and running again, enjoy your water! If you notice a pattern of salt bridge formation, give us a call. We will be happy to provide a free exam and consultation for your system and help you figure out the best way to proceed.

water softener

                        problems caused by hard water

Time to install a water softener?

Scale build-up?

Bad taste & odor in water?

Stains on sinks, tubs, & laundry?

More scrubbing to get mineral deposits off faucets & shower heads?

If you’re experiencing any of these problems it’s time to get  your water tested.  A water softener system is the most cost-effective way to correct hard water hassles.

Once you’ve made the decision to install a water softener, you have some other choices to make.

DECISIONS, DECISIONS….

One choice will be the type of water softener you buy. Another will be how you will install the system. Many homeowners are comfortable with plumbing tasks and can do a DIY install. Others will want to enlist the services of a professional.


If you’re thinking about a DIY install, here are some pointers to get you started:


1. PERMITS

Be sure to check with your local building codes. Some locations require permits for installation of water softener units. They may also require emergency by-pass or shut-off valves. Local code requirements may affect your choice of system.

2. CHOOSE YOUR SYSTEM

Once you have the permit issue clear, your next step is to choose which water softener system you want to install. A multitude of online water softener sites provide an overload of information. You can get better information and more personal answers from your local water treatment service. We’ll help you evaluate your needs and get the best system for you.

soldering a copper pipe3. TOOLS

OK. You’ve gotten your permit and selected your system. Before you go to pick it up, or have it delivered, make sure you have the basic tools need to get the job done properly. Basic plumbing tools should be enough to get you started.

Pipe cutter      Pipe wrench      Torch & solder      Pipe fittings      Flex pipe tubing      Copper pipe           PVC solvent      Teflon tape      Elbow unit      Gloves and safety goggles     Pipe wrenches

4. CHOOSE YOUR LOCATION

Permit? Check. System? Check. Tools? Check. Excellent! water softener
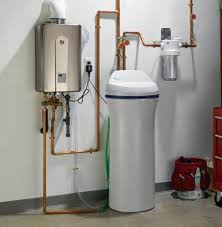
Now you need to find a place in your house where you will install the system you’ve chosen. Things to remember when selecting the location for your water softener include:

  • Easy for you to access to install & maintain
  • Access to electrical outlet
  • Close to drainage (floor drain, standpipe, sump pump, or utility sink)
  • Connection must be before water heater split
  • Connection must allow softened water to water heater and inside faucets, but not to outside hose faucets

5. INSTALLATION PROPER

water shut off
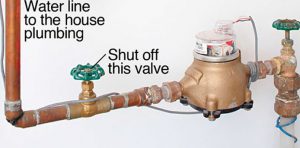
(Note: These are general installation steps. We like these DIY instructions for salt-based, reverse osmosis, and magnetic systems.)

Step 1: Shut off water to house.

Find the shut-off valve (usually in your basement) and close it. Now, open the lowest valve in your house water line to drain all water from the inside pipes. Once pipes are drained, proceed to the next step.

Step 2: Cut the main line.

Use your pipe cutter to cut open the main water line where you’ve chosen to install your water softener.

Step 3: Connect by-pass or shut-off valve.

Follow manufacturer instructions to install the by-pass or shut-off valve. You should install this as a safety feature whether your local building codes require it or not.

water softenerStep 4: Tie in to water supply.

Use copper or flexible tubing and pipe fittings to connect water softener to main water supply.

Step 5: Set up drainage

Connect drain hosing to unit and clamp it in place. Feed the end of hose near where it will drain. Be sure to leave about a two-inch gap to prevent any backwash from contaminating the system.

Step 6: Connect brine tank (salt-based systems)

Connect the large backflow hose to the brine tank. Refer to your manufacturer’s instructions for details.

Step 7: Flush tank

Turn the valve into the bypass position and flush water through to clear any debris or sediment in the tanks.

Step 8: Add salt (salt-based system)

If you own a salt-based system, add salt to the brine tank following your manufacturer’s instructions.

Step 9: Turn on the water

Start by turning on a cold water tap somewhere in the house. Next, turn on the main line valve slowly until it is fully open.

Step 10. Plug unit in and set up timer

Plug your unit securely into the outlet. Follow manufacturer instructions to set timer on your system. Timer settings include time of day, hardness level of your water, and details related to the rinse and regeneration cycles of your individual model.

THAT’S IT! Enjoy your new soft water!!!

Knoxville Water Treatment knows that installing a water softener system requires a lot of work. If you have questions during your DIY installation, or if you decide you’d like a professional to do the job, give us a call today. We’re stocked with top-of-the-line water softener systems and offer free water testing. Get in touch today!


Loading

Whether you are thinking of implementing a new bird bath in your winter landscape or caring for one you currently have, this article will serve as a guideline to take proper care of it and its guests. Let’s get started.

Know your neighborhood.

It may be helpful to first know the birds that live in your neighborhood and what their migration patterns are. Do the bird species living in your neighborhood overwinter (not migrate at all), and if not, when, in what month do they migrate and when do they return? It’s also helpful to know your region’s weather patterns. When, if at all, do bodies of water freeze?

Buy the best material for withstanding the weather.

Depending on the weather patterns of your winter season, you should choose the appropriate material for a bird bath that will stand the test of time. If water repeatedly freezes and thaws in your region, you should avoid baths made of cement, stone, or glass. The best material, no matter where you live, is plastic or resin. These materials are shatterproof and can take the changes of the season. Dark colors are best because they attract the sun’s warmth.

Keep your bird bath warm using these tips.

  • Strategically place your bird bath to get the most exposure to the sun, the same way you do with house plants.
  • An insulating blanket wrapped around your bath will also aid it in keeping warm.
  • Prevent freezing by using the element of wind. If you place a ball on the top of the water, the wind will keep it moving along the bath and prevent thin layers of ice from forming.
  • Plastic liner products will make it easy to remove any ice that has formed.
  • You can also heat water on the stove, let cool a little, and then pour it into an existing freezing over bird bath to stop the freezing process. Never add boiling water to a bird bath, use excessive force trying to break ice, or antifreeze chemicals or salt. They are not safe for your bird bath or more importantly, your bird friends!
  • And last, but definitely not least, an electric-heated bird bath option is available for purchase, but are the most expensive option. If you live in an extreme weather region, this may be your only option.

Some of the water purification devices on the market are not really purifiers, at all. If you aren’t careful about which water purification device you choose, you could waste a lot of money and end up with little or no protection. Here’s how to tell the difference.

1. High Priced does not always mean high quality.

Most of us are used to paying more to get more, but when it comes to a water purification device; price has nothing to do with quality. The most expensive systems on the market include a reverse osmosis (RO) step.

Now, I’m talking only about systems that are designed for use by homeowners with a public provider. If you have a private well or other private source, you need laboratory testing to determine contaminants and then you can design an effective system.

If reverse osmosis is your only choice to remove specific contaminants, then you will also need to include other steps. Some companies’ advertisements make it seem that RO is all that you need, when nothing could be further from the truth.

People who are serviced by a public provider do not need an RO step in their water purification devices. There are less expensive, more effective options.

2. Low Priced might not do the job

On the other end of the spectrum are cheap products like the Brita water purification device. While the system does remove chlorine and some other common contaminants, it does not remove chlorine byproducts, commonly referred to as THMs.

THMs or trihalomethanes are known carcinogens. For many years, we were told that the amount released during the chlorination process was safe for consumption. The first studies that showed an increased cancer risk from this level of consumption were withheld from the public.

Now, we know that one of the reasons we need water purification devices in our homes is because of THMs and the increased cancer risk that accompanies them. If a water purification device does not include a multi-media adsorptive block, don’t buy it. No matter how cheap it is, it is still a waste of money.

3. The Best Water Purification Devices.

The best systems include several steps to remove the widest range of contaminants. First, granular carbon to reduce chlorine and other chemical contaminants, then a multi-media block to further reduce chemicals and get rid of the ones that are not trapped by carbon, alone.

The block should have a sub-micron sized porous structure to prevent water from circling around the granules, which would result in less effective contaminants removal. The structure also removes illness causing parasitic cysts that can be deadly.

The best water purification device also includes an ion exchange step to remove lead and other metallic ions. Heavy metals are exchanged for potassium and sodium, to both improve the taste and the healthfulness of your water.

These are not the most of the least expensive systems. The price is around a hundred dollars for a kitchen counter top purifier. People who install water purification devices like these save thousands of dollars per year by not buying bottled. It’s the safest and most economical choice for your family.