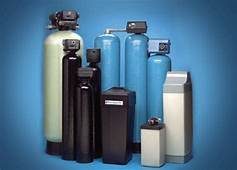
Posts

Water softeners.

Salt-based. AMT. Ion-exchange. RO.

Choosing a new water softener can be confusing. Don’t let the process tie you in knots!

The bottom line:  consider what would benefit your household the most. To help you get a handle on finding your new water softener system, we’ve put together a list of the most common water softeners and a brief explanation of their pros and cons. Happy reading!

Salt-Free Water Softenerssalt free water softeners

While it is commonly thought that salt-free water softeners remove hard water chemicals, that is not the case. This type of water softener changes the chemical composition of the magnesium and calcium in the water so that they won’t stick to surfaces. All that means is that you won’t have a residue buildup in pipes and lines, the walls of your hot water heater, and no “scales” on your dishes. The “salt-free” water softener doesn’t “soften” one’s water, but rather “conditions” it. This option is more of a filtration system than a water-softening system.

Magnetic/Anti-Scale Magnetic Treatment (AMT)

The AMT is less expensive than some other water softener options, including salt-based. It has an incredibly long-life expectancy of up to forty years. This would also be a great option for the household that needs to limit their daily sodium intake. While this option is considerably cheaper than its counterparts, unfortunately, hard water scaling
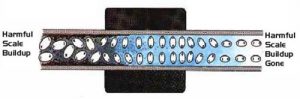
it comes with a catch. An AMT doesn’t remove hard water chemicals, it just alters their composition, so they won’t leave as much “scale” effects on dishes. This option does not prevent buildup in water-using appliances where water stays for up to forty-eight hours, such as a hot water heater. There is also less scientific evidence that this method works efficiently and effectively.

Salt-Based/ Ion Exchangesalt based water softener ion exchange

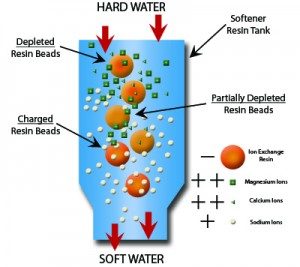
This water softener option uses the process of Ion Exchange, which removes the hard water chemicals magnesium and calcium from the water. During this process, the hard water chemicals are attracted to a negatively charged polymer resin bed, which is what removes them from the water supply. Those chemicals are replaced by positively charged sodium ions when salt is used to clean the water softener and regenerate the resin bed so that it can continue to do its job effectively. This option is the exact definition of what a water softener is.

Reverse Osmosis

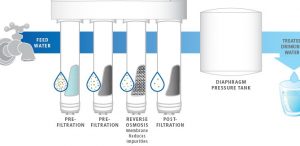
As with the salt-free water softener system, Reverse Osmosis (RO) is more of a filtration system than a water softening system. This option uses hydrostatic pressure across the membrane, which acts as a type of water filter. This process physically removes contaminates and hard water chemicals from the water supply itself. Below is a list of benefits for installing a reverse osmosis system:

reverse osmosis system

Tasteless water– some water supplies have a foul taste to them and adding a RO system might help to alleviate this problem.

Tinted and/or Stinky Water– hard water minerals and even some impurities can cause a water supply to look murky and have an unpleasant smell. RO might help to fix this.

This option is also considered more environmentally friendly than others since it doesn’t use chemicals in its process. Some reports say that this process can remove up to ninety-eight percent of water imperfections. RO can be a tricky system to use. For example, some reports find that consumers only had five to fifteen percent of usable water returned. The rest just washed down the drain. You can read more about reverse osmosis water softeners here.

So, how do you decide?

Ultimately, it is up to you, but Knoxville Water Treatment is here to help. Our experts in water softening systems can meet with you and help you determine what is best for your household. We’ll help you assess past concerns and issues, identify your specific household needs and get the water softener system that’s just right for you and your family. Give us a call today!

water softener

                        problems caused by hard water

Time to install a water softener?

Scale build-up?

Bad taste & odor in water?

Stains on sinks, tubs, & laundry?

More scrubbing to get mineral deposits off faucets & shower heads?

If you’re experiencing any of these problems it’s time to get  your water tested.  A water softener system is the most cost-effective way to correct hard water hassles.

Once you’ve made the decision to install a water softener, you have some other choices to make.

DECISIONS, DECISIONS….

One choice will be the type of water softener you buy. Another will be how you will install the system. Many homeowners are comfortable with plumbing tasks and can do a DIY install. Others will want to enlist the services of a professional.


If you’re thinking about a DIY install, here are some pointers to get you started:


1. PERMITS

Be sure to check with your local building codes. Some locations require permits for installation of water softener units. They may also require emergency by-pass or shut-off valves. Local code requirements may affect your choice of system.

2. CHOOSE YOUR SYSTEM

Once you have the permit issue clear, your next step is to choose which water softener system you want to install. A multitude of online water softener sites provide an overload of information. You can get better information and more personal answers from your local water treatment service. We’ll help you evaluate your needs and get the best system for you.

soldering a copper pipe3. TOOLS

OK. You’ve gotten your permit and selected your system. Before you go to pick it up, or have it delivered, make sure you have the basic tools need to get the job done properly. Basic plumbing tools should be enough to get you started.

Pipe cutter      Pipe wrench      Torch & solder      Pipe fittings      Flex pipe tubing      Copper pipe           PVC solvent      Teflon tape      Elbow unit      Gloves and safety goggles     Pipe wrenches

4. CHOOSE YOUR LOCATION

Permit? Check. System? Check. Tools? Check. Excellent! water softener
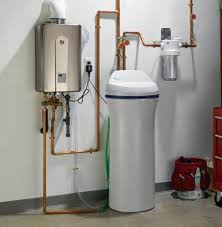
Now you need to find a place in your house where you will install the system you’ve chosen. Things to remember when selecting the location for your water softener include:

  • Easy for you to access to install & maintain
  • Access to electrical outlet
  • Close to drainage (floor drain, standpipe, sump pump, or utility sink)
  • Connection must be before water heater split
  • Connection must allow softened water to water heater and inside faucets, but not to outside hose faucets

5. INSTALLATION PROPER

water shut off
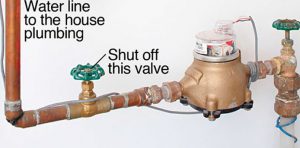
(Note: These are general installation steps. We like these DIY instructions for salt-based, reverse osmosis, and magnetic systems.)

Step 1: Shut off water to house.

Find the shut-off valve (usually in your basement) and close it. Now, open the lowest valve in your house water line to drain all water from the inside pipes. Once pipes are drained, proceed to the next step.

Step 2: Cut the main line.

Use your pipe cutter to cut open the main water line where you’ve chosen to install your water softener.

Step 3: Connect by-pass or shut-off valve.

Follow manufacturer instructions to install the by-pass or shut-off valve. You should install this as a safety feature whether your local building codes require it or not.

water softenerStep 4: Tie in to water supply.

Use copper or flexible tubing and pipe fittings to connect water softener to main water supply.

Step 5: Set up drainage

Connect drain hosing to unit and clamp it in place. Feed the end of hose near where it will drain. Be sure to leave about a two-inch gap to prevent any backwash from contaminating the system.

Step 6: Connect brine tank (salt-based systems)

Connect the large backflow hose to the brine tank. Refer to your manufacturer’s instructions for details.

Step 7: Flush tank

Turn the valve into the bypass position and flush water through to clear any debris or sediment in the tanks.

Step 8: Add salt (salt-based system)

If you own a salt-based system, add salt to the brine tank following your manufacturer’s instructions.

Step 9: Turn on the water

Start by turning on a cold water tap somewhere in the house. Next, turn on the main line valve slowly until it is fully open.

Step 10. Plug unit in and set up timer

Plug your unit securely into the outlet. Follow manufacturer instructions to set timer on your system. Timer settings include time of day, hardness level of your water, and details related to the rinse and regeneration cycles of your individual model.

THAT’S IT! Enjoy your new soft water!!!

Knoxville Water Treatment knows that installing a water softener system requires a lot of work. If you have questions during your DIY installation, or if you decide you’d like a professional to do the job, give us a call today. We’re stocked with top-of-the-line water softener systems and offer free water testing. Get in touch today!


Loading

hard water spots
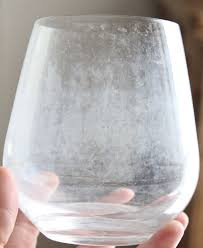
Part 1  Recap: Hard Water

In Part 1 of our series on water softeners, we discussed the effects of hard water on your pipes and appliances. We also noted how hard water reduces the effectiveness of soap and detergents and leaves chalky-white streaks and spots on dishes.

Of all the solutions we explored, water softeners provided the most efficient and cost-effective means of getting the unwanted minerals out of your hard water while still leaving it palatable.


Water Softener Componentshard-water-solutions, water-softeners

Three basic components comprise a water softener system.

  1. Mineral Tank-This is where the action is. The mineral tank constitutes the heart of the water softening system.  It contains the resin beads necessary in the ion exchange process that removes calcium and magnesium from your hard water.
  2. Brine Tank-The brine tank holds an aqueous solution usually containing a very high concentration of sodium. Sometimes the sodium is replaced with potassium, depending on the needs of the homeowner. The brine tank plays a key role in the regeneration cycle, which we’ll discuss in a later paragraph.
  3. Control Valve-This important component of the system determines when it is time to clean the resin beads that have been accumulating calcium and magnesium from the hard water flowing though the system. We’ll compare the different types of control valves and timers available in a later paragraph, also.

How Does It Work?

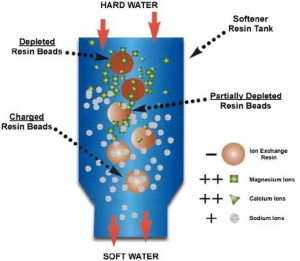
Calcium and magnesium in hard water create lots of problems. Water softeners remove the calcium and magnesium from the hard water and replace them with a mineral that doesn’t cause scaling. The minerals trade places through a process known in chemistry as ion exchange. We’ll talk about the process in common terms, but for those interested in the science behind ion exchange we found a You Tube video and a website that give a great explanation.


Ion exchange–trading scale-producing calcium and magnesium for non-scaling sodium or potassium.water softeners, sodium chloride

  • Polymer resin (like plastic beads) fill the mineral tank. These beads are covered with sodium or potassium  ions.
  • Hard water flows into the mineral tank.
  • Because of their electrical charge, calcium and magnesium ions in the hard water attach to the negatively-charged resin beads.
  • Sodium or potassium ions detach from resin beads and release into the water when calcium and magnesium attach.
  • Softened water circulates back into the household supply.

What happens when the resin beads “fill up” with calcium and magnesium ions?hard-water-solutions, water-softeners

This is where the control valve and brine tank come into play. Calcium and magnesium eventually saturate the resin beads. This means that the beads can no longer attract these ions. They need to be cleaned. Water softeners clean the resin beads in a three-stage process called regeneration. Here’s how it works:

Step 1: Backwash

The control valve reverses the water flow. This removes all debris  from the mineral tank and flushes it out the drain.

Step 2: Recharge

In step 2, brine (very salty water) from the brine tank pumps into the mineral tank and flushes the resin beads. The high concentration of salt in the brine forces the calcium and magnesium ions to detach from the resin beads. Calcium and magnesium ions move back into the water. The salt (either sodium or potassium ions) then attaches to the resin beads. Finally, the salty water, now filled with calcium and magnesium ions, flows into the drain.

Step 3: Rinse

Water softening resumes once recharging finishes. The mineral tank fills with hard water and ion exchange begins. When calcium and magnesium once more saturate the resin beads, the control valve initiates the regeneration process.

As you can tell, the control valve manages the entire process. In order to make the best choice, you need to know what’s available for you. Homeowners have a choice of types of valves to use.

Types of Control Valves

water softeners, hard water solutions

Automatic water softener control valves fall into three categories.

Some use an electric timer. The timer flushes and regenerates the water on a regular schedule regardless of the ion concentration. During the regeneration phase with this kind of timer, softened water is not available.

Another type of timer uses a computer. The computer monitors how much water passes through the mineral tank. When the pre-determined volume of water is reached, the computer starts the regeneration process. Systems with a computer timer generally reserve resin beads. This means that some soft water is available during the regeneration phase.

The third type of automatic timer uses a mechanical water meter. The water meter determines water usage. This means no water is wasted and the mineral tank recharges only when necessary.  When you add second mineral tank to this system, you can have soft water even during recharging.

hard water solutions

Take Your Pick

Water softeners come in all shapes and sizes, but each one provides you with a simple solution to your hard water problems. Not sure what’s best for you? Give us a call. We have the water treatment experts who can determine the perfect system for you.

            Water, anyone?

Who doesn’t love a glass of cool, clear water on a hot day? Unfortunately, many people who go to their sink for a glass of refreshing, clean, clear water find themselves disappointed — or even kind of grossed out. Water taps across the country spurt odd-smelling water. The water often has unidentifiable particles of … well, something… floating in it and even sticking to the sides and bottoms of the glasses. No thanks! If this describes the water from your tap, it’s time to invest in a water filtration system. One of the most popular types of drinking water filtration systems is the reverse osmosis water filter system, or RO, for short.

What is Reverse Osmosis?

You usually hear about  reverse osmosis as a way to make ocean water drinkable by removing the salt.  Dictionary.com  says reverse osmosis is the process of producing pure water by forcing water with salt or other solid particles in it through a semi-permeable membrane. In order to really understand reverse osmosis, we need to talk first about regular osmosis.

Osmosis

Osmosis occurs when water moves through a semi-permeable membrane from an area of higher concentration of water particles to an area of lower concentration of water particles.

   Think of it this way:

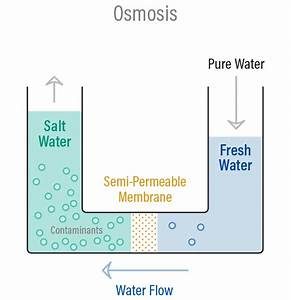
You have one cup of fresh water and one cup of water with salt mixed into it. You pour the salt water into the left side of this U-shaped glass beaker. Then you pour the fresh water into the right side. A very thin plastic membrane filled with thousands of very tiny holes sits in the center of the bottom tube of the beaker. When you pour the cups of water into each side of the beaker, the fresh water flows to the side of the salt water.  The water level in that side of the beaker rises. This happens because there are more water molecules in the fresh water compared with the water molecules in the salt water. The fresh water moves toward the salt water to even up the number of water molecules.

Reverse Osmosis

Reverse osmosis occurs when you apply  pressure to salt water. The pressure forces the salt water up against the membrane. The salt particles are too large to fit through the membrane openings and only the small water particles are pushed through. The membrane effectively filters out the salt and contaminants, allowing the now-clean water to pass through and mix with the fresh water on the right-hand side.
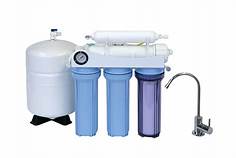
So how does all this work in a home drinking water system?

How reverse osmosis water filters work in your home

If you want to install a reverse osmosis system for your whole house, we can help with that. Most families, however, choose to start with a much smaller reverse osmosis water filter system that fits underneath the counter.

The reverse osmosis water filter system is connected to your water supply and the system processes the water  through a series of 3 to 6 tube filters before it passes into the storage container.  A separate faucet, installed on your sink, draws clean, filtered water from the storage tank. Some folks don’t want to install a complete reverse osmosis water filter system under their sinks. Most stores also carry a counter-top model of the reverse osmosis water filter system. This unit sits on the counter and connects directly to the faucet.

Now what?

Not sure if you want to try a DIY install for your reverse osmosis water filter system? Or maybe you need help figuring out what type of water filter system is best for you. Whatever your water purification needs, Knoxville Water Treatment can help. Give us a call today and start treating yourself to the best water you can get!


Loading

The loudest indicator you may want to get your water checked out is if it contains a funny taste, color, or odor. There may not be anything wrong with the water, just like seemingly clean water may have unwanted contaminants. Water that smells might have high levels of hydrogen sulfide or sulfur bacteria. Taste and color can vary along with many properties found in water. All these things can easily be explained with quick and simple testing.

If you’ve moved into a new home, especially if you’ve purchased a home, it’s a great time to test your water and make any adjustments necessary to optimize your water supply. If over time you realize that your water use appliances are working less efficiently or have residue build up, this is another indicator that your water levels should be checked and optimized for the life of your appliances, as well as other fixtures around the home. Another instance you may want to call a professional is if there is a resident in the home with a compromised immune system and you want to take the most precautions possible.

If you’ve found yourself in any of these situations, you can find yourself a local water treatment professional and make an appointment for them to come to the home and test.. Another option is to take a sample of the water yourself and mail it to a qualified laboratory for testing. If done in the home, the test only takes but ten minutes. Some of the things being tested for are the following: bacteria, micro-organisms, hardness, PH, acidity, alkalinity, sulfur, nitrite, nitrate, metals, chlorine and pesticides.

Once the results are obtained, you or your water treatment professional will be able to compare what you’ve got against the recommendations for safe levels of each element. From there you will be given the appropriate suggestions to modify your home to eliminate or balance any issues. This may include installing water filters (of many sizes, placements, types and purposes) or a water softener, and further water testing appointments in the future!

Somewhat common and potentially poisonous elements that could be found in your water include fluoride, chlorine, many types of pesticides and gasoline additives. These things can cause serious damage to vital organs with long term exposure. Testing is an excellent first step and beyond that, you may decide to just use the water for certain purposes and purchase drinking water you know is pure. A simple test is worth the time and expense if you aren’t already aware of what kind of water you are working with!